Wednesday 26 September 2012

It' zzzZzzzZzzzz Party Time


Midnight feasts and sweet treats, ghost stories and giggles this is what slumber parties are made of. 

Slumber parties are a great option for girls especially when they reach that 9-11 age where they are pre-teen and too young for the whole disco vibe, but far too mature for any of the baby stuff of their previous parties;) It requires slightly more patience and admin on the parents part, because everyone knows with the amount of sugar and junk food involved  the girls are sure to be up to mischief half the night. But despite the extra effort it is worth it as slumber parties are definitely the ones to be remembered. I still have the fondest memories of going to sleep over parties, where you all camp out in the lounge tucked in on mattresses like sardines and talk and giggle into the early hours of the morning when you sneak off to the kitchen for a midnight feast on all the left over party snacks. Then it's candy dreams for everyone until  early the next morning when the chatter and laughter starts again and the smell of flapjacks drifts into room. 

Of course it doesn't hurt getting some extra help when it comes to slumber parties and that's where we come in to make things a little easier. For this slumber party we provided some decor, food and party packs to take at least a little stress off the birthday mother.

We had a small room to decorate and it was really about just making it cute and girly. For the entrance to the room we hang thin feather boas over the door that the girls would walk though. This created a secretive effect, like the room was now separated from the rest of the house by this 'magical girl zone curtain'. 


    The room itself we draped with cerise and purple organza and fairy lights and added a happy birthday banner as well. 


For the food, keeping everything bright and colorful was the call of the day, which resulted in these fun cheerful cupcakes.


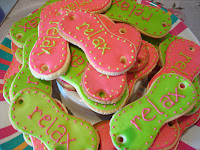
We also made cookies in the shape of eye masks and I stuck with using the fun bright colors. Piping the word 'relax' onto all those cookies certainly was tiring on the hand, but it really worked to finish them off perfectly. 

Then the cake had to be little girls all tucked in next to each other in a big bed. By special request of the birthday girl, she was to be the only character awake while her friends slept beside her.


The party packs were great as they basically made themselves look good with minimal effort on our part. We found these gorgeous handbag style boxes in the vibrant colors of the party. All I needed to do was add a button, a tag and some gems and they were good to go.

There is nothing at a slumber party that actually makes the guests want to go to sleep. Perhaps they are called slumber parties, because of the result they have on the parents subsequently and not as an indication of what actually happens at the party. Sleeping really has nothing to do with it;) 


Thursday 13 September 2012

Blog the Builder-can we party?

We most certainly can.

As far as boys themes go a construction party is certainly a cute option, especially for the younger ones who love Bob the Builder and Handy Manny. There are so many great tools to play around with and fun elements like construction hats and bulldozers that it's actually quite difficult to choose what you are going to make use of. We started this construction party off with a hammer...

We found the idea for the invitations online and they were just too cute. A little hammer in scrapbook style, right up my ally. 


I cut the invitations from brown cardboard that acted as the base and border. Onto the hammer head I stuck grey card and the for the handle I used yellow card with a stippled effect. The party information could all be found on a tag attached to the front of the hammer and partially secured with an eyelet that looked like a screw. For this particular party Bob was added to the invites, but without him these invites could really be used for any construction themed party. 


We didn't supply much in terms of decor for this party, except for the always popular photo board and loads of helium balloons to add fun and color.


For the party packs we decided to make red tool boxes. I cut the middle section out of the box so that it was open and then added a thin dahl stick as the handle. Each tool box also had a thank you note in the shape of a tool. We also added tissue paper for aesthetic appeal.


For this party the client wanted a number of different themed food items. The first was our decorated lollipops with pictures of Bob.


The easiest shape to cut out is a wrench, so most of the food we made into wrench shape. The sandwiches were little wrenches and so were the cereal treats which we also made silver with food coloring powder.


The cookies were also wrenches, but we also added hammers for something a little different. I used royal icing and silver food coloring powder to try and create the effect of a metal tool. The hammer handle I piped in a way to mimic the look of the invitations.


As a healthy option the client wanted fruit sticks, so these we just made bright and colorful to hopefully draw the children into eating them. On the stands of the fruit sticks we added little construction buildings to bring in the theme.


We actually landed up making two different Bob the Builder cakes for this client, one for the party and one for a prior celebration as the birthday boy couldn't wait to get his cake. The first style of cake was a cut out covered with fondant and some 3D elements and the party cake was a 2 tier with Bob as the centre piece and all his building apparatus adorning the rest of the cake.


And there you have it, constructing a building party is a piece of cake;)


Wednesday 5 September 2012

Yo Ho Yo Ho a Pirates Life for Me


Hello me mateys and welcome to me blog all about throwing a great pirate party. Think black billowing sails, the skull and crossbones, peg legs and parrots, it's time to be a pirate, arrrrg. 

Although this theme has been in existence since time in memorial there are so many elements to work with when it comes to pirates that it always makes for loads of fun. I've been wanting to organise a pirate party for such a long time and we always seem to miss out on the opportunity to do so, but this time we landed the job and it was sails open and full speed ahead.


I must say that with this pirate party I had the most fun making all the different decor items. One of our large props was a pirate ship, cutout from corex and painted, that we placed behind the food table as a backdrop. On either side of the ship we had a little girl pirate and a little boy pirate. These also acted as a way to tell the difference between the girl and boy party packs, the girl's being on the table in front of the girl pirate and the boy's on the boy pirate side.                                 


On the table itself we also had a pirate ship as part of the centre piece. The ship acted to add theme and a bit of fun the the child's name as we always try to do. I used cardboard to make the ship but added a 3D element with the sail.


But decorating the table area was not our only decor task for this party. The client wanted the whole room to be a pirate paradise and we very happily obliged. On one of the walls we placed a treasure map that was cute and colorful and more suited to being a decor item than just a X marks the spot, skull and cross bones kind of one. 


We also had a pirate photo board where the kids could stick their heads through and really look like pirates. It's also a great photo op for all the mommies and daddies attending the party and wanting to get cute photos of their littlies. 


Then my absolute favorite decor prop and scene is the treasure chest with the added effect of the palm tree and large rum barrel.The barrel and palm tree I cut from corex and painted and the treasure chest a creative friend made using cardboard boxes and a type of foam material. I painted it to make it look like wood with gold trim and very proudly made the lock;) We scattered some chocolate gold coins to finish things off.


For the party packs we've been wanting to make little treasure chests for ages and we were finally able to do just that for this party. They landed up being rather small, because using a computer template, the largest we could print on was A3 and so once folded they were quite mini. Although this was adorable it did make packing them a challenge, but we managed. We changed some of the usual items that our party packs contain to fit the theme so they had some gold coins and edible necklaces as well as pirate related toys the boys getting plastic pirate figurines and the girls a 'gem' ring.


The pirate food was the usual party food that any plundering pirate needs, apart from a few theme related items and the strategic placement of a pirate flag;)


There were some palm tree and ship chocolates as well as pirate ship and face cookies.


Our final contribution to the party was a treasure chest cake, yet another pirate inspired item I've been wanting to make for ages. We had a little trouble securing the lid of the chest, but after a bit of engineering and some handy skewers we managed. The client wanted butter icing so I made grooves to look like wood and then we filled the inside of the chest with loads of fun brightly colored jewel-like sweets. This cake is an old classic, but it really is an attention grabber and despite the lid securing issue fairly simple to achieve. 


And there you have it me mateys, it really is a pirate's life.